Efficient end-to-end payment processing is an essential component of any successful business. A key aspect of this process is notifying customers about the payment status. Customers need to know whether the payment was successful or not. This blog post will discuss how easy integrating Fyno's automation module with Razorpay (used as an example here) to handle all payment-related notifications is.
Automation, as the name suggests, is a feature within Fyno’s application that will help you “automate” the otherwise manual tasks of “what happens if, or when” situations arise within a journey that a customer can face.
Automation also helps you visualize the entire piece on an easy workflow-builder, allowing you to easily make changes, provide actions, set up conditions and provide the next action based on each outcome, to complete the journey for the customer, whatever the outcome may be.
Razorpay is a popular payment gateway used by businesses of all sizes. While Razorpay ensures that the payment is processed seamlessly, companies need to ensure that they appraise customers about what happened during the payment process.
Enter Fyno.
Fyno is a notification gatekeeper that takes the burden of notification processing off your hands. With our automation feature, handling your payment notifications from Razorpay is a piece of cake! Read on to learn how.
Also, we'll be doing this without writing a single line of code.
With Fyno, you have the choice to send out various notifications across multiple channels. To help explain this example better, let’s go with SMS and see how this shapes up!
You can read more about different channels and providers in Fyno's detailed documentation.
To create this automation, here’s what you need handy
- A Fyno account
- An account with Razorpay
- SMS integration in Fyno with one of the configured SMS providers
Note: Throughout this tutorial, we will use a payment link as the payment collection method in Razorpay's test mode.
The following is the step-by-step process for creating a successful payment notification system:
- Create the automation in Fyno.
- Create a webhook in Razorpay. This webhook will trigger the automation.
- Generate a payment link on Razorpay and send it to the customer.
- The customer completes the payment.
- The Razorpay webhook is initiated and triggers the automation in Fyno.
- Fyno sends a 'successful payment' notification to the customer.
Let's begin, shall we?
To create this automation, we'll need to create a template and an event in Fyno. A template can be considered as the piece of content you want to communicate to your customers. The template can be only content or contain media as well, depending on the mode of execution (WhatsApp and Emails support media).
An event is an amalgamation of a template, a route and a mode of execution, that is all stitched together into one and triggered as a single occurrence.
An Event is an action through the Fyno app that triggers an external notification with all the logic of routing and content from the templates via an easy-to-use API that plugs into your application. We will use this template to send a pre-defined message when a payment is successful.
To create the template -
- Navigate to Fyno's template page
- Click on 'Create'
- Provide a template name (Razorpay-template in our case)
- Click 'Create Template'
- Select the channel as SMS
- Create your template message
- Click 'Save'
Note: We will work in Razorpay’s test mode. Also, since we will first run this automation using test data, we can wait to promote this template. We will do that at the end.
The {{}} syntax are placeholders. They will be replaced with actual data before sending the notification. Add the placeholder variables to the template with the handlebars ({{ }}) syntax when typing the content. We will use this method in the current example.

Note: Another way to add the placeholder variables to a template is to type the template content precisely as above (with the placeholder {{}} syntax). We will then specify the names of these variables by clicking on the 'Placeholders' button in the side panel. This way, all the placeholders will be visible while creating the automation, and one need not pass them as additional data.
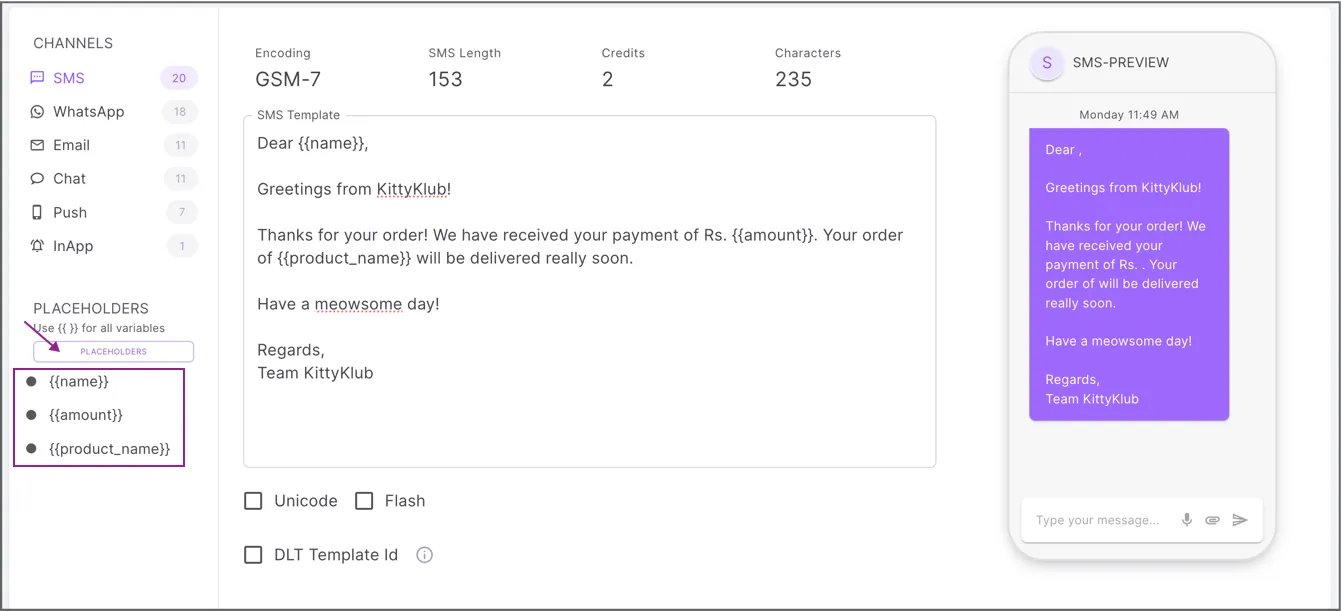
Now that the template is ready, we’re set to create an Event. An event in Fyno is an action that sends out a notification. We can configure the event to send a notification via one or more channels using a template or a route.
To create an event -
- Navigate to Fyno's events page
- Click on 'Create'
- Provide an event name (Razorpay-payment-event in this case)
- Click 'Create Event'
- Select the template that we just created
- Select the rule as 'Manually Select Channel'
- Check SMS as the preferred channel for this event
- Select the appropriate SMS integration
- Click 'Save'


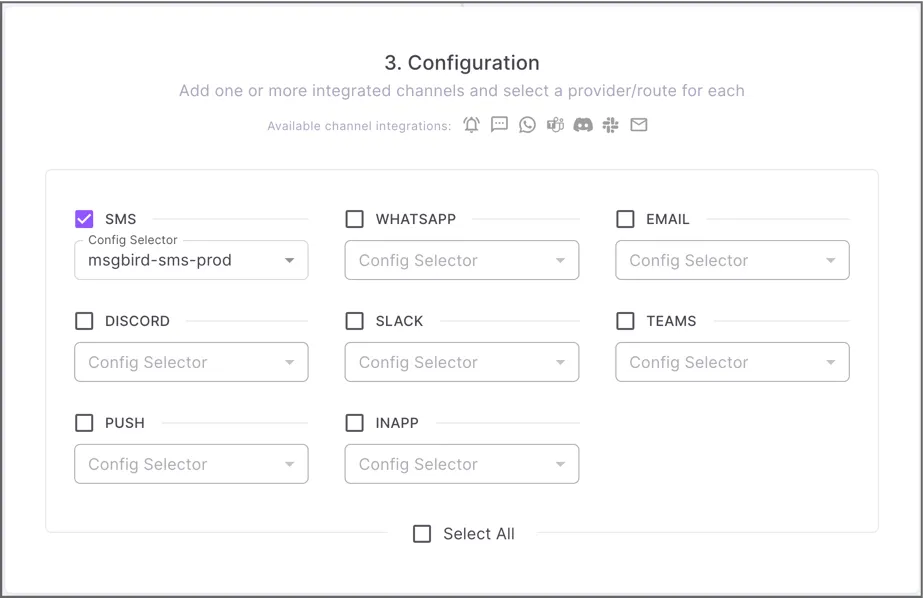
You can also test this event using Fyno's cURL dialog.

Note: The event can also remain in test mode for now. We will promote it at the end.
With the template and event raring to go, the last step is to create the automation.
To create the automation -
- Navigate to Fyno's automations page
- Click 'Create'
- Provide an automation name (Razorpay-payment-automation, for instance)
- Click 'Create Automation'
Once we create the automation, we will land on the automation builder page. Every automation will have its unique link. You can copy this link from the 'Copy Link' option. This link will be required when we create the webhook in Razorpay.
The first step while creating the automation is to specify a trigger. It is important to remember that a webhook will trigger this automation in Razorpay. When the webhook receives a 'payment success' response from Razorpay, it will invoke the automation via the automation link. Therefore, we will need this 'success' response to build the automation flow. To create our trigger step, add Razorpay's 'payment_link.paid' sample JSON payload as the sample payload for the trigger. Select the content type as 'application/JSON. On saving the form, we will see an option to create an action or a condition in the next step. POST is the default HTTP method. This can be changed to GET depending on the use case.
Note: all of Razorpay's sample payloads are available here
The sample payload will be available to build the subsequent steps in our automation. Notice that the payload contains an ‘event’ key with the 'payment.captured' value. We will use this key as the first step in our conditional.
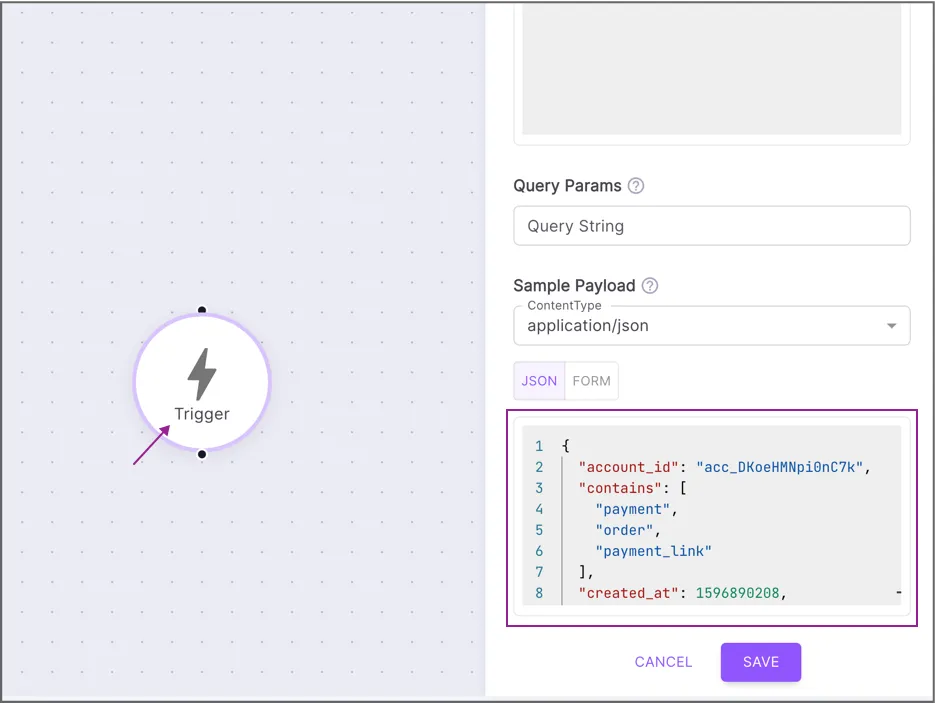
To create a condition node -
- Select 'Condition' as the next component in the automation.
- Select 'Variable' as the condition.
- We will now see all the keys from the sample payload JSON that we specified in the trigger step.
- Search for and select the event key.
- Select the operator as 'equals',
- Specify the value as 'payment.captured'.
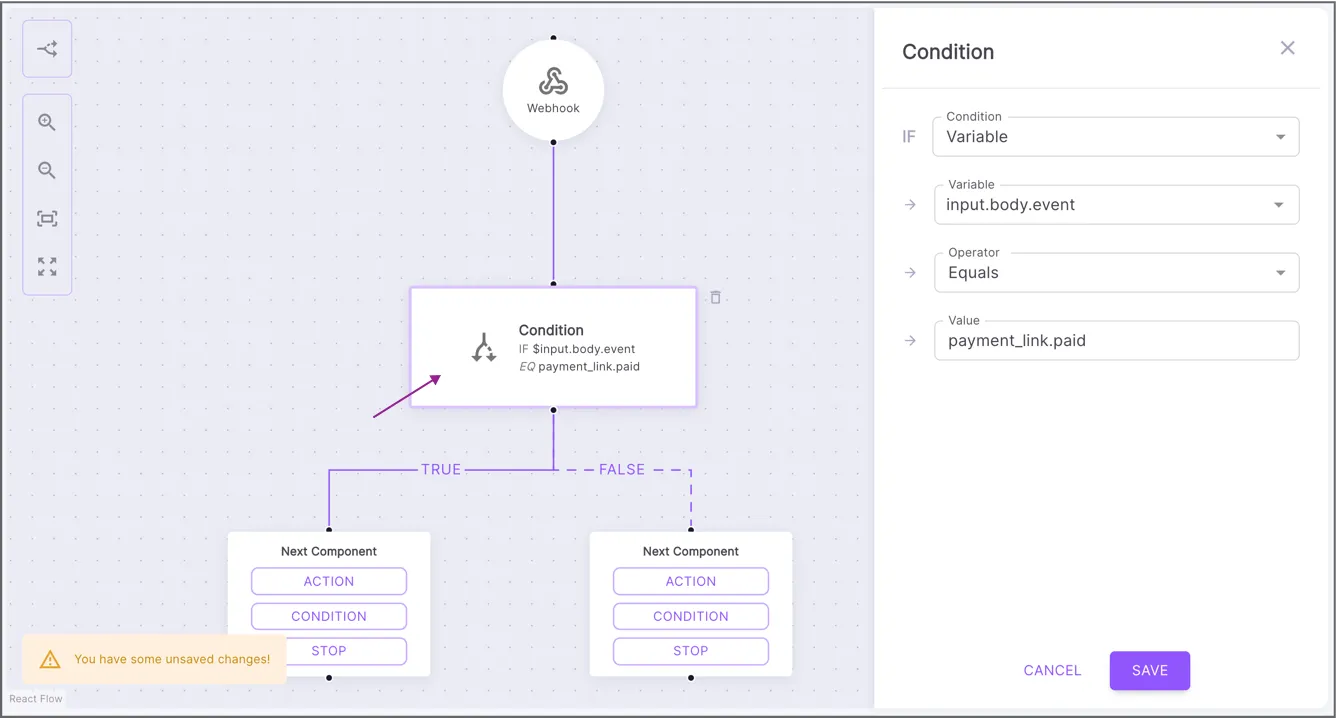
**Note: ’**input.body’ is automatically appended to the key. It tells the automation that the 'event' key is part of the body (payload) of the input trigger.
Once we create the condition node, we will see options to add the true/false branches for the condition. In our case, when the automation is triggered if the value of the ‘event’ key in the incoming payload is 'payment.captured', we want to fire the SMS to the customer. So, we will fire the SMS using the event we created earlier.
To add an event to the automation -
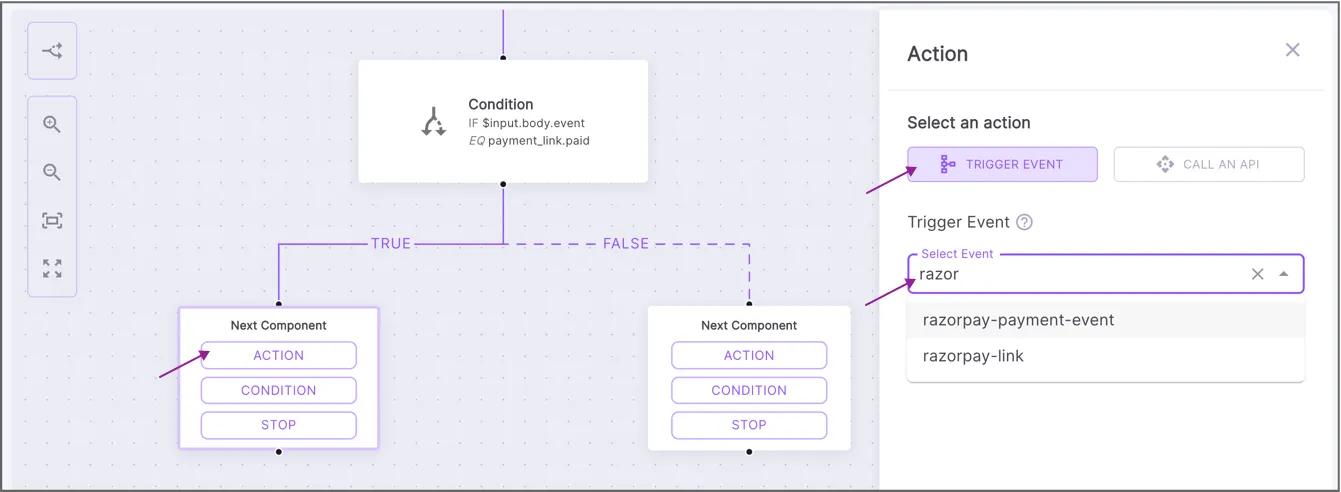
- Select 'Action' as the next node in the ‘true branch’ of the conditional node.
- Search for and select the 'razorpay-payment-event' in the dropdown.
- The sample payload has a key named contact which contains the recipient's phone number. Select this field as the value for the SMS recipient.
- Our template has 'name', 'amount' and ‘product_name’ as placeholders. We need to include these as key-value pairs in the additional data. The values for these placeholders will be appropriate keys from the payload.
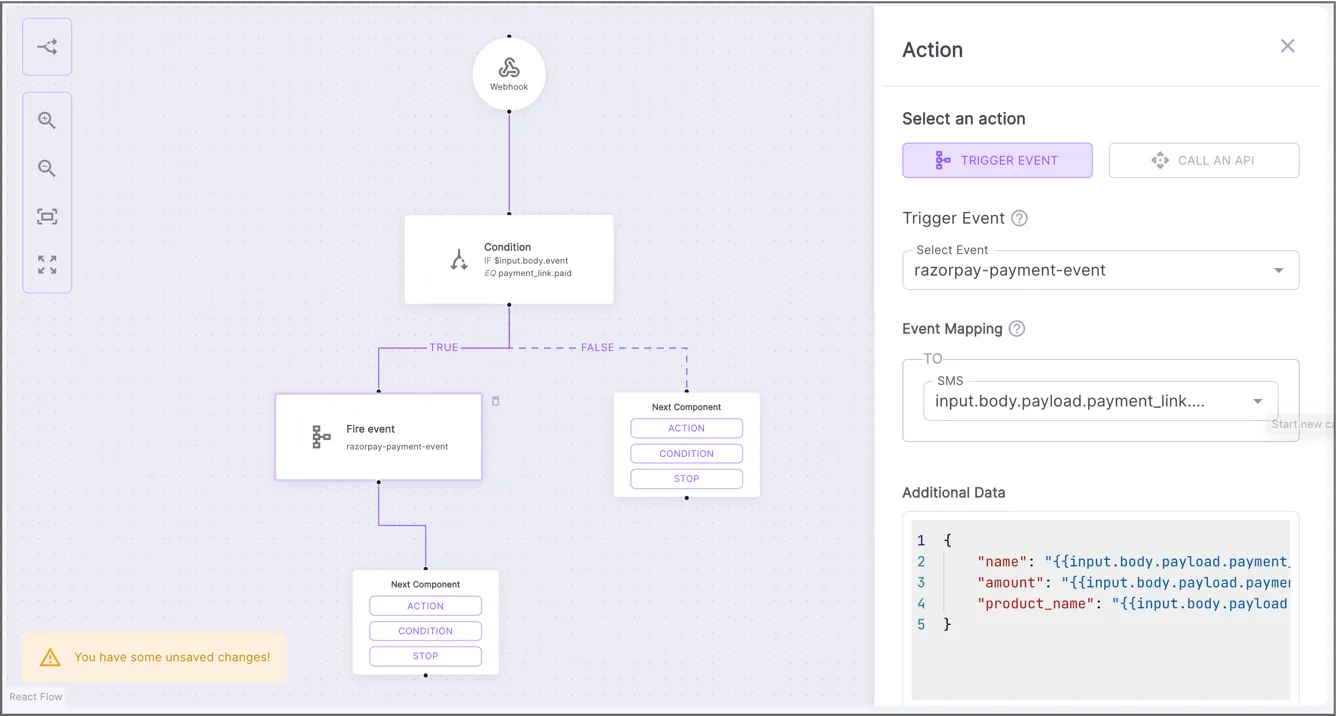
Note: When adding placeholder values from the payload in the additional data, it is necessary to specify them with the {{$<value>}} syntax.
Note: If placeholders are added to the template using the ‘Placeholders’ option on the side panel on the templates page, the placeholders will be visible on the Trigger Event form. Therefore, one does not need to send them as additional data.
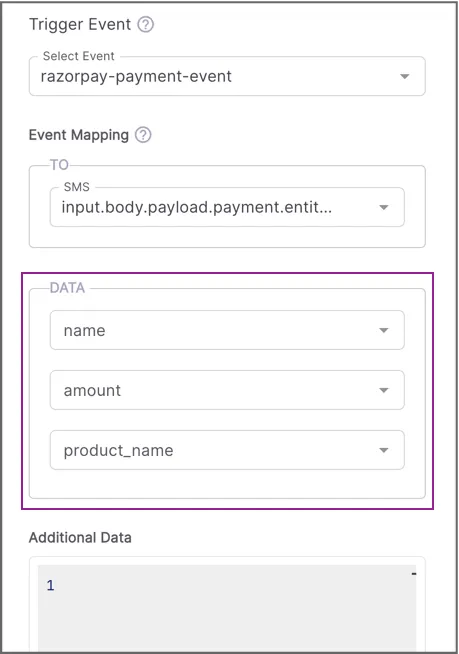
Once we send the SMS, we want to stop the automation. So the next node in the true part of the condition (following the event) will be 'STOP'. Similarly, if the condition fails, we can add more conditions or actions depending on how we want to handle this scenario. For simplicity, we will stop the automation in our example by selecting the ‘STOP’ option.
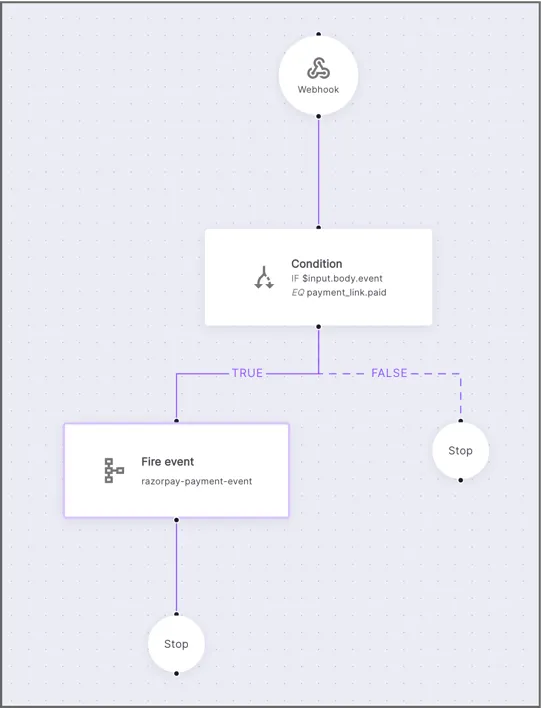
With the automation created, we will now configure our automation to run in Razorpay. Before moving to Razorpay, copy the URL of the automation and keep it handy. To do this -
- Log into your Razorpay account and make sure you are in test mode.
- Select the 'Developers' option in the navigation pane, and select 'Webhook'.
- Click 'Add New Webhook'.
- Paste the automation URL in the 'Webhook URL' field.
- Add a random secret value.
- Provide an email address to receive a notification in case the webhook fails.
- Select 'payment.captured' as the active event.
- Click 'Create Webhook'
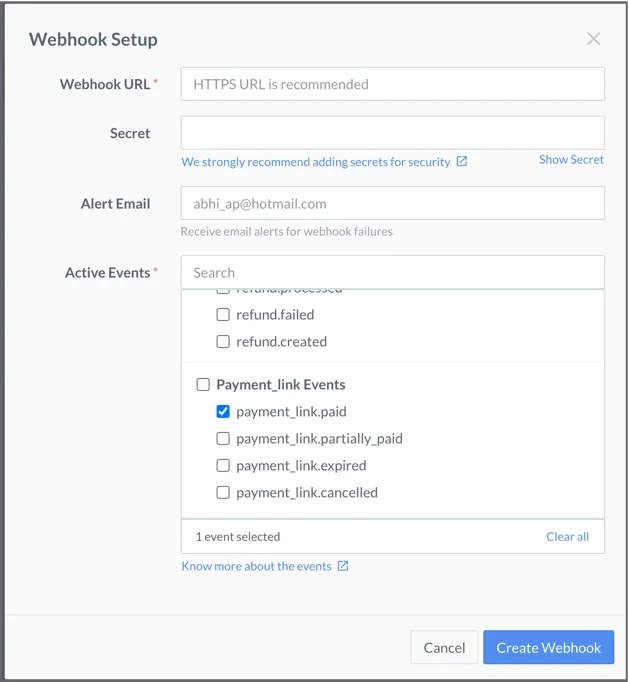
That's it! We can now create a standard payment link from Razorpay and test our notification. Make sure to mark the payment as 'Success' to fire the automation. Once the automation fires, the recipient's phone number will receive a message per the content template we created earlier.
Final steps - now that you have successfully created and tested your first automation, promote the template, event and automation. This way, you will receive live analytics in Fyno whenever Razorpay triggers this automation.

You could also make this automation smart -
To include multiple Razorpay payment events in a single automation, one can add nested conditional nodes to check for different payment statuses. So, if a payment fails, a check for status === payment.failed can be added in the 'false branch' of the first conditional node to handle the failure appropriately. This way, one automation can handle all the payment processing-related notifications.
The depth of this feature is extremely intriguing and can be used for multiple use cases such as the above-explained example. Here’s to making notifications simpler, and more meaningful.
See you in the next one!


